Blog
Use Better Digging Techniques to Get More Out of Your Excavator
August 14, 2023If you’ve got a job to do and that job requires excavation work, you probably want to get the most out of your excavator. One proven way to manage that is by employing better digging techniques. One example: maintaining a stable slope angle of around 45 degrees can significantly improve digging efficiency and prevent excessive soil collapse, giving you better results in your projects.
That may help, but there’s a lot more you can learn about excavating to further optimize your excavator’s performance. Below are a few practical tips about adapting your digging techniques to various soil types, using different attachments for specific tasks, and making use of advanced telematics features to track and enhance your overall productivity. Interested? Read on, because there’s still a lot of ground to cover… and to move.
What Digging Techniques Work Best for Different Soil Types?
When it comes to excavation, not all soils are created equal. Different soil types require specific digging techniques to optimize your excavator’s performance. Let’s explore the best practices for handling various soil conditions and how you can adapt your approach for each.
Soft and Sandy Soils:
When dealing with soft and sandy soils, it’s crucial to prioritize gentleness and precision. Lower the digging speed and use a bucket with wide teeth to prevent excessive soil disturbance and cave-ins. Gradually scoop out material in small increments, ensuring stability while maximizing productivity. Additionally, consider using tracks with wider shoes to reduce ground pressure, minimizing the risk of sinking in loose terrains.
Clay and Compact Soils:
Clay and compact soils can be challenging to excavate due to their high cohesion and tendency to stick to the bucket. To tackle these soils effectively, use a bucket with smooth edges and teeth designed to cut through the material cleanly. Maintain steady and controlled movements, as aggressive actions may cause unnecessary wear on the bucket and lead to reduced efficiency. Moreover, having an adjustable arm and boom can help you maneuver around tight spots and maintain stability during excavation.
Rocky and Hard Soils:
When facing rocky and hard terrains, selecting the right attachment is crucial. Consider using a hydraulic breaker or a ripper attachment to break up the tough surface before digging with the bucket. This method not only reduces wear on the bucket but also speeds up the digging process. Remember to keep a close eye on the bucket’s teeth and replace them promptly if they show signs of wear, as damaged teeth can significantly impact digging performance.
POSITIONING YOUR EXCAVATOR
Stability is key to effective excavating, and your excavator will be more stable if it’s based on a larger, firmer platform… the larger the better. The ideal placement will allow you to confine the actual digging either to the front or the rear of the machine, dumping your bucket loads to the side of the excavator. That will enable you to work from a truck, container, or spoil pile that’s positioned much more closely to your excavator’s side, This reduces the required distance of each pass you make, saving you time and fuel.
Need to make repeated long reaches? Stability is extremely important for any such situation. To gain the greatest stability for a long reach, you should dig diagonally, reaching directly over and across the corners of your excavator tracks.
OPTIMIZING YOUR DIGGING RANGE
The most effective digging range for your stick will start at an approximately 35° to 45° degree angle back to vertical. The farther outside of this range you dig, the less efficient the overall action. This will increase cycle times and can contribute to a less stable excavation platform. It’s a good rule of thumb that by the time your stick reaches the vertical position on a reach, the bucket should be loaded. While you dig, you can reposition the excavator undercarriage either forward or backward as needed in order to retain the ideal 35° to 45° degree digging range.
In addition, you can utilize the stick “crowd force” and bucket “curl force” to provide you with additional breakout power, without burning through a lot of extra fuel. Your stick “crowd force” is the force that’s generated by moving the stick inward, whereas the bucket “curl force” is created by the bucket cylinder and linkage. By maintaining the bucket “curl force” at least 10-15% greater than your stick “crowd force” you’ll be able to maintain optimal performance while digging. That percentage can be directly impacted by such disparate factors as bucket design and the use of ground-engaging tools, both of which can really affect the performance of your excavator when digging.
FINDING AND MARKING UTILITIES BEFORE DIGGING
It’s vitally important for you to phone your local regional One Call System before you start digging on any site. This is required by law and can save you the hassle and massive fines of damaging underground utilities. You should call ahead no less than 48 hours before you plan to begin digging, to correctly identify the time and place of the planned excavation. When you call ahead, your project info will be formally logged and the local utilities should be notified to visit your potential dig site so they can properly mark their buried lines and facilities.
Be advised that all such markings should be considered approximate, and you should respect an 18”- 36” tolerance zone on either side of the marking. Digging within that tolerance zone runs the risk of rupturing the buried utilities there.
Markings are commonly indicated by color-coded flags, each color based on which specific utility is buried beneath the site:
- Red flag: Electrical power lines, cables, conduit or lighting cables
- Yellow flag: Natural gas, oil, steam, petroleum, chemicals or other gas.
- Orange flag: Communications, phone lines, alarm lines, signal lines or cable TV.
- Blue flag: Water, irrigation or slurry lines.
- Green flag: Sewers or drains.
- White flag: Planned excavation.
- Pink flag: Temporary survey markings.
- Purple flag: Reclaimed water.
It’s a mistake to assume that someone else has already contacted the One Call System. It’s far better to make multiple calls to ensure your site is reported and utilities have been dispatched than it is to arrive at the job site ready to dig, only to discover that none of the utilities have been properly marked beforehand.
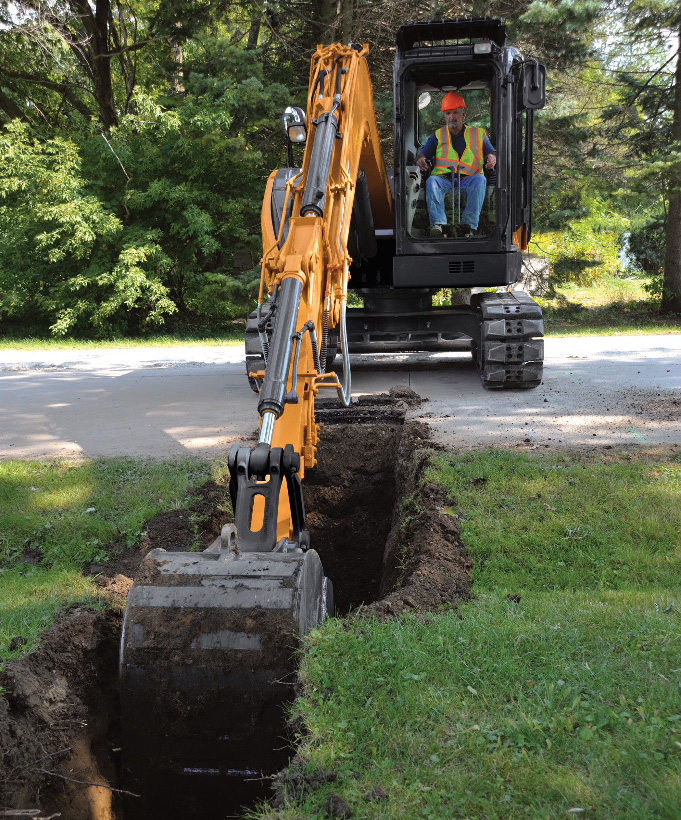
TRENCHING TECHNIQUES
When trenching, best practice is to start shallow at the top and work your way down layer by layer. Don’t start digging at the bottom, filling your bucket by raking up the face. Digging a trench from the bottom up is much harder on the equipment and will extend the length of your digging cycle, since it requires you to extend all the way down to the bottom of the trench on every pass.
When trenching, it works best to set your excavator facing the work area. Avoid digging over the side.
Every excavator has a maximum digging envelope. Within that maximum range, there is an optimal working range that is most efficient. Try to stay within this optimal range to maximize your digging ability, using the combined force of both stick and bucket to retrieve full bucket loads with every pass, preventing wasted effort and half-full passes.
When it comes time to finish off the straight walls of your trench, plan on finishing the far wall first. In order to move your bucket in a straighter line, move the stick out while you move the bucket down. Hold the bucket open, keeping it vertical. When it’s time to finish off the closest wall, you should lift the bucket straight upward, keeping the cutting edge vertical.
How Can I Leverage Excavator Telematics to Boost Productivity?
In today’s digital age, an entire generation of new excavators now come equipped with advanced telematics features that can revolutionize your construction projects.
Learn MORE about CASE SiteWatch telematics
Harnessing these technologies can lead to improved productivity, reduced downtime, and better overall efficiency. Let’s delve into how you can leverage excavator telematics to your advantage.
Real-Time Equipment Monitoring:
Telematics allows you to access real-time data on your excavator’s performance, such as fuel consumption, engine health, and operation hours. By keeping a close eye on these metrics, you can identify potential issues before they escalate, schedule timely maintenance, and ensure your equipment operates at its peak.
Operator Performance Tracking:
Telematics can also provide valuable insights into your operators’ performance. You can monitor their digging techniques, idle times, and fuel efficiency. With this information, you can provide targeted training to improve their skills, leading to more productive and proficient operation of the excavator.
Geolocation and Job Site Planning:
Telematics enables you to track the location of your excavator, ensuring it stays within the designated work area and preventing unauthorized use. Furthermore, this data can help you optimize job site planning by analyzing travel routes and identifying potential efficiency improvements.
The Benefits of Regular Excavator Maintenance
As someone who has managed more than a few construction jobs (all of which had pre-set budgets and scheduled, non-negotiable completion dates) I definitely understand the temptation to push your equipment to its limits. However, neglecting regular excavator maintenance can be a costly mistake. Let’s take a closer look at the advantages of staying on top of your machine’s maintenance needs:
Enhanced Equipment Lifespan:
Routine maintenance, including oil and filter changes, inspections, and component lubrication, keeps your excavator in top shape and prevents premature wear and tear. Regularly serviced equipment has a longer lifespan, saving you money in the long run by reducing the need for costly repairs or early replacements.
Minimized Downtime:
Scheduled maintenance allows you to identify and address potential issues proactively, reducing the risk of unexpected breakdowns during critical phases of your projects. Minimized downtime means you can stick to project timelines and avoid delays that might impact your reputation or result in financial penalties.
Optimal Performance and Fuel Efficiency:
A well-maintained excavator operates at its best, delivering optimal performance and fuel efficiency. This translates to increased productivity and lower operational costs, allowing you to get more work done with less fuel consumption.
Mastering better digging techniques for your excavator, understanding the right methods for different soil types, utilizing telematics features, and prioritizing regular maintenance can unlock the full potential of your heavy construction equipment. By incorporating these strategies into your excavation projects, you’ll experience improved efficiency, reduced costs, and greater success in your construction endeavors. You’ll not only get more out of your excavator in general, but you’ll also elevate the quality and amount of work you do to new heights.
Do you require the best quality construction equipment for your next project? Contact us now to discover why Eagle Power & Equipment is your one-stop shop for everything related to construction equipment sales, rentals, maintenance, and repairs.
Related Articles
Mighty Minis: Impressive Deals on CASE CX17C and CX37C Mini-Excavators
Monster Demolition Cutters For This CASE Excavator
CASE Power Lease
How To Get The Most Out Of Your Excavator
Backhoe or Excavator? Choosing The Right Machine For Your Project
The Mini Excavator: Power and Flexibility in a Compact Package
Toro Dingo: The Versatility and Value of Multi-Use Equipment
Summer Weather Equipment Maintenance Tips
How Much Can An Excavator Dig In A Day? [Includes Formula]
When Size Matters: Choosing the Right Size Equipment for the Job


https://www.high-endrolex.com/47